Overview
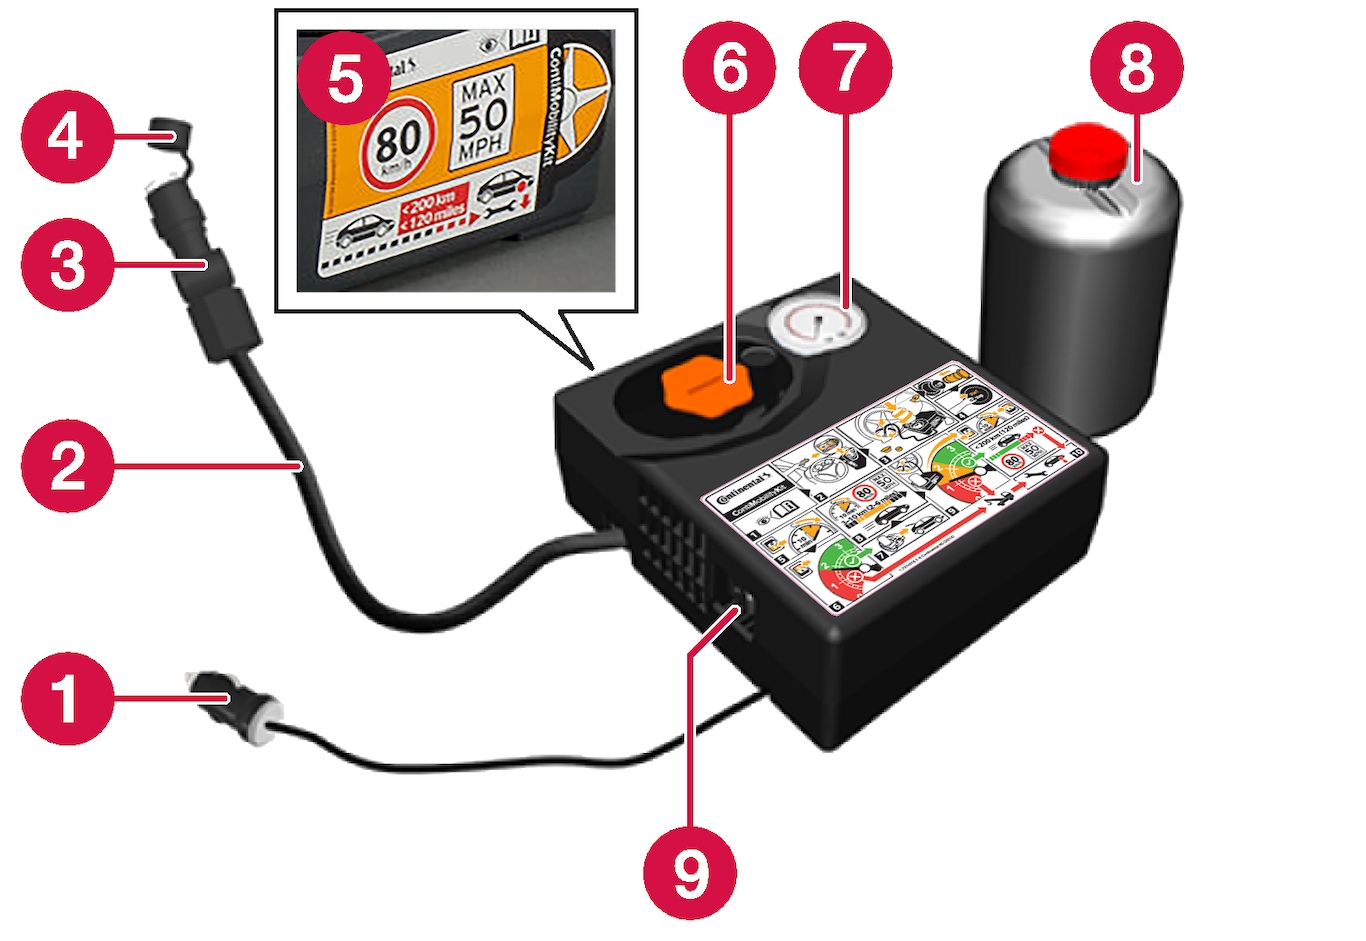
 Electrical cable
 Air hose
 Pressure reducing valve
 Protective cap
 Label, maximum permitted speed
 Bottle holder (orange cap)
 Pressure gauge
 Sealing fluid bottle
 Switch
Connecting

Note
Warning
- The sealing fluid bottle contains 1) rubber latex, natural and 2) ethanediol. These substances are harmful if swallowed.
- The contents of this bottle may cause allergic skin reactions or otherwise be potentially harmful to the respiratory tract, the skin, the central nervous system, and the eyes.
- Store out of the reach of children.
- Harmful if ingested.
- Avoid prolonged or repeated contact with the skin. If sealing fluid has come into contact with your clothes, remove them.
- Wash thoroughly after handling.
- Skin: Wash affected areas of skin with soap and water. Get medical attention if symptoms occur.
- Eyes: Flush with plenty of water for least 15 minutes, occasionally lifting the upper and lower eyelids. Get medical attention if symptoms occur.
- Inhalation: Move the exposed person to fresh air. If irritation persists, get medical attention.
- Ingestion: Do NOT induce vomiting unless directed to do so by medical personnel. Get medical attention.
- Disposal: Dispose of this material and its container at a hazardous or special waste collection point.
Warning
Preparations
Set up the warning triangle and activate the hazard warning lights if a tyre is being sealed in a trafficked location.
If the puncture was caused by a nail or similar, allow this to remain in the tyre. It helps to seal the hole.
Detach the decal for maximum permitted speed that is affixed on one side of the compressor. Affix it visibly on the windscreen as a reminder to observe the speed limit. You should not drive faster than 80 km/h (50 mph) after the emergency tyre repair kit has been used.
Screw in the bottle to the bottom of the bottle holder.
The bottle and the bottle holder are equipped with a reverse catch to prevent sealant leakage. When the bottle is screwed in it cannot be unscrewed from the bottle holder again. The bottle must be removed at a workshop2.
Warning
Unscrew the tyre's dust cap and screw in the air hose's valve connection to the bottom of the thread on the tyre's air valve.
Check that the pressure reducing valve on the air hose is fully screwed in.
Begin puncture repair
Connect the electrical cable to the closest 12 V socket and start the car.
Note
Warning
Warning
Start the compressor by flicking the switch to position I (On).
When the compressor starts, the pressure can increase up to 6 bar (88 psi), but the pressure drops after about 30 seconds.
Warning
Important
Switch off the compressor to check the pressure on the pressure gauge. Minimum pressure is 1.8 bar (22 psi) and maximum is 3.5 bar (51 psi). Release air using the pressure reducing valve if the tyre pressure is too high.
Warning
Note
- After a tyre has been inflated, always refit the dust cap in order to avoid damage to the valve from gravel, dirt, etc.
- Only use plastic dust caps. Metal dust caps can rust and become difficult to unscrew.
Fit the protective cap on the air hose in order to avoid leakage of the remaining sealing fluid. Place the equipment in the cargo area.
Warning
Follow-up inspection
Connect the air hose on the tyre valve and screw in the valve connection to the bottom of the tyre valve's thread. The compressor must be switched off.
Read the tyre pressure on the pressure gauge.
- If it is below 1.3 bar (19 psi) then the tyre is insufficiently sealed. The journey should not be continued. Call roadside assistance for recovery.
- If the tyre pressure is higher than 1.3 bar (19 psi), the tyre must be inflated to the pressure specified in accordance with the tyre pressure label on the driver's side door pillar (1 bar = 100 kPa = 14.5 psi). Release air using the pressure reducing valve if the tyre pressure is too high.
Warning
Volvo recommends that the car is driven to the nearest authorised Volvo workshop for the replacement/repair of the damaged tyre. Advise the workshop that the tyre contains sealing fluid.
The sealing fluid bottle and hose must be replaced after use. Volvo recommends that these replacements be performed by an authorised Volvo workshop.